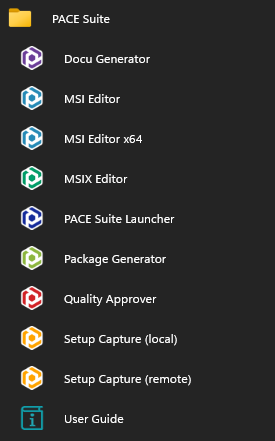
How to Create an MSIX Package with PACE Suite. Step-by-Step Guide
With the help of Infopulse’s application packaging tool PACE Suite, clearByte is able to deliver high-quality packages in a quick and timely manner granting a Swiss Made quality to their clients worldwide.
clearByte is a Switzerland-based software packaging and workplace company that offers software packaging as a service, partly on-site at the customers offices and off-site. Following the hand-in-hand customer strategy and agile approach, clearByte is in the IT market for 14 years.
One of ClearByte’s top experts Peter Fankhauser will guide you through the creation of an MSIX package with the PACE Suite.
Background
At clearByte, we have been working with PACE Suite for years to create software packages and use them in mass distribution. We are also an exclusive PACE Suite distribution partner in Switzerland and therefore the direct local contact to its developer company Infopulse.
Our cooperation has always been extraordinarily good and resulted in high quality of the solution. Infopulse proved to be a reliable partner and demonstrated high competence and fast reaction to whatever we requested, from feature enhancements to work on bug fixes. Eventually, PACE Suite has grown into a powerful MSI and MSIX packaging tool and it is hard to imagine our daily work without it.
Why we use PACE Suite for applications packaging
- The user interface (UI) and the architecture of the PACE Suite are designed according to modern standards. The whole tool and its integral components are very comprehensive and yet not sluggish. Besides, the speed is high and enables nimble handling when packaging, even when monitoring or snapshotting installation processes.
- Another plus point of PACE Suite: The numerous applications in the scope of the tool make the creation of installation packages much more efficient. Within the MSI Editor, there are many add-ons and wizards that facilitate the editing of the MSI tables. For example, setting permissions on directories/registry, install drivers or the feature/component overview, which allows user to see the resources per feature at a glance.
- The Custom Action Wizard is very useful too. In addition, we like the support in the context of duplicate files for user resources (files in the user profile), which generate overhead every now and then. The Docu Generator, featured in this guide, is also a frequently used tool for creating installation documentation.
- And now the icing on the cake: The price-performance ratio of PACE Suite is in our opinion unbeatable in the packaging market.
Step-by-step Guide: Creating an MSIX Package with PACE Suite
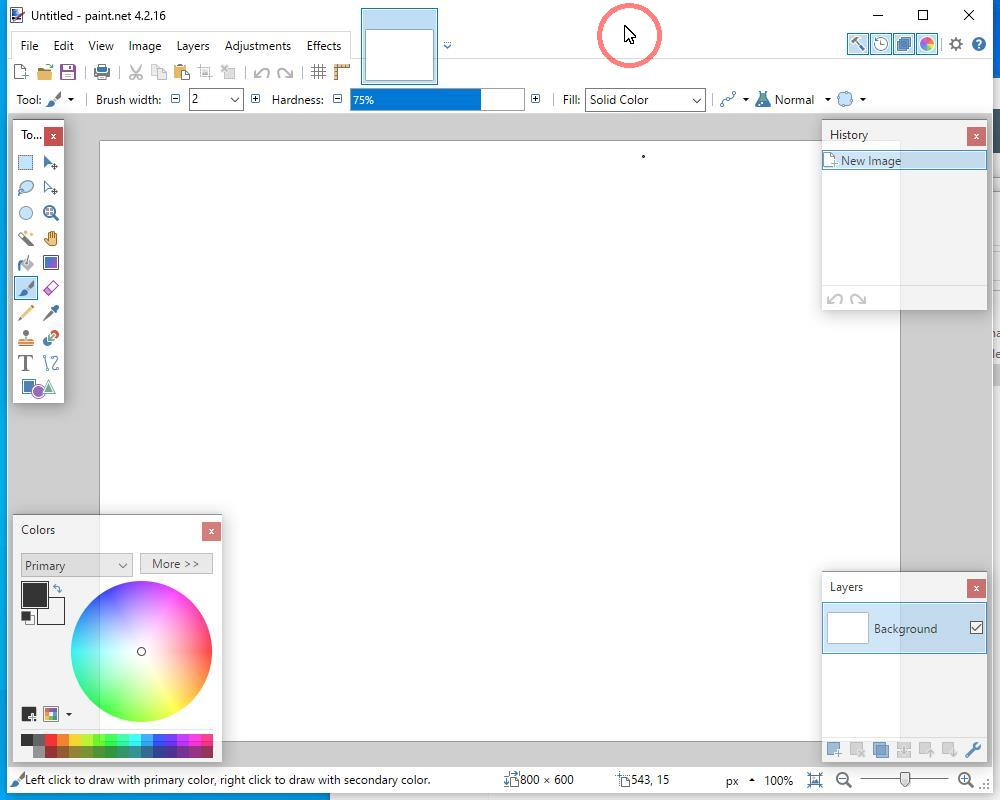
In this example, we will show how to create an MSIX package from the Windows application Paint.Net 4.3.26.
The following part of this guide is created with help of PACE Suite.
Step 1.
Run PACE Suite Launcher either from the Start Menu or Desktop shortcut on your work station (PC).
Step 2.
Select Local Setup Capture to perform the repackaging on the local work station, where PACE Suite is installed; or select Remote Setup Capture to repackage on the remote virtual machines.
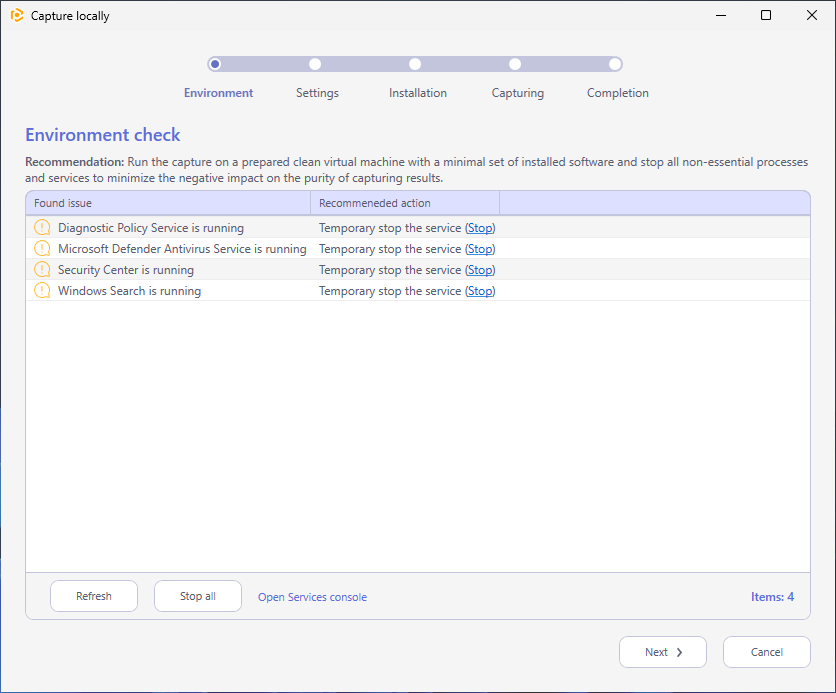
Step 3.
In order to avoid capturing a ‘system noise’ and get more pure capturing results, stop running the non-essential services and process, displayed in the list. Thereafter, click Next >.
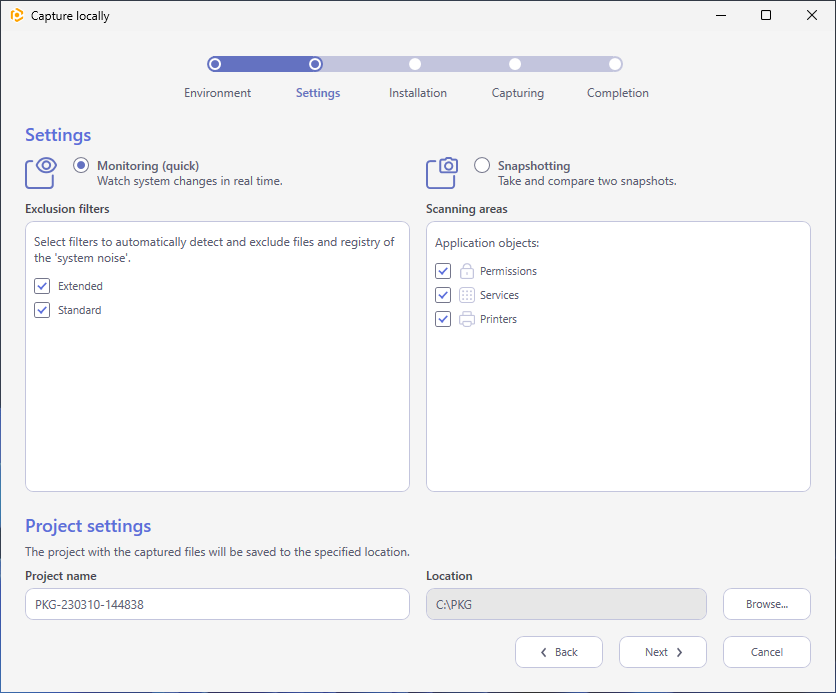
Step 4.
Select the capturing method, project name and its location. Choose exclusion filters that will be used to detect and filter out the unnecessary resources.
- Use Monitoring method for the quicker capturing.
- Use Snapshotting method for capturing huge installations and those that require the system restart.
We will use the Monitoring method.
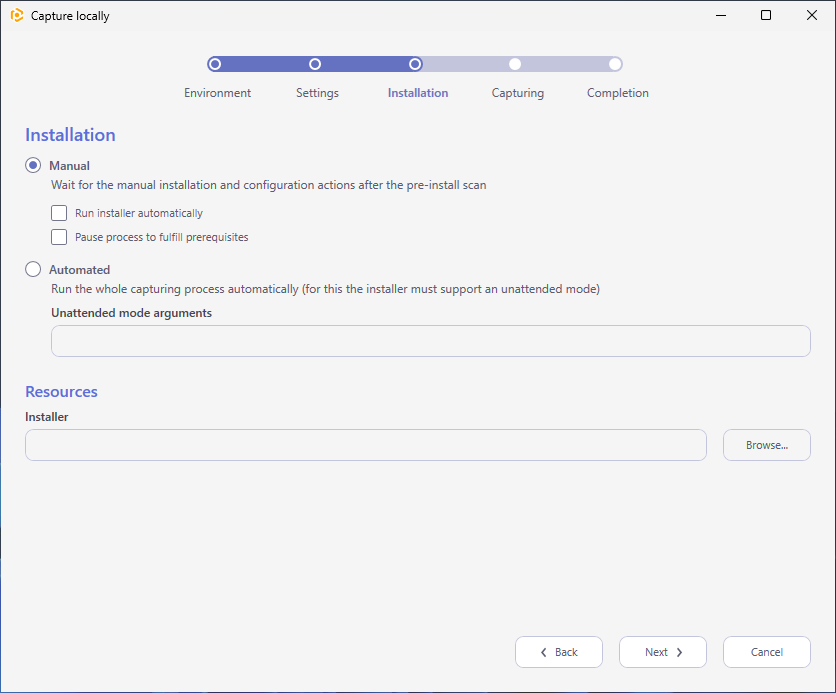
Step 5.
Select the installation processing mode.
- In the Automated mode the wizard runs your Source installation with Arguments between the pre-install and post-install scans. The post-install scan starts once the process of the run source installation is ended.
- In the Manual mode, the wizard will pause after the pre-install scan to allow you to install any set of apps, change the required app settings and make any system changes that you need to capture and include in the package.
We will use the Manual mode.
Step 6.
Wait while the pre-install scan is carried out.
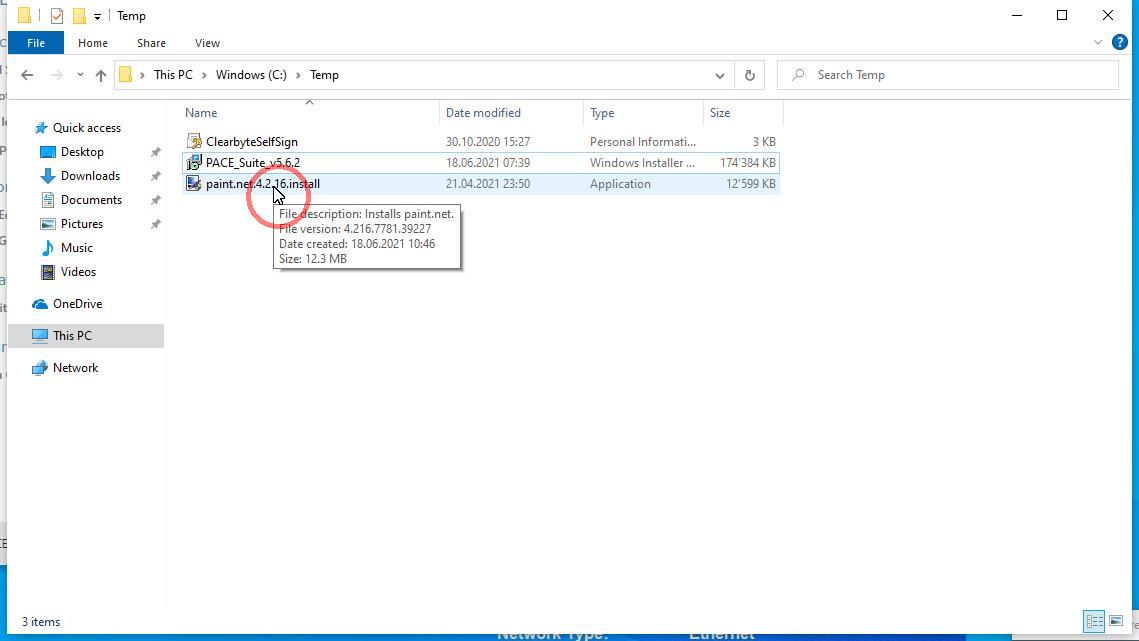
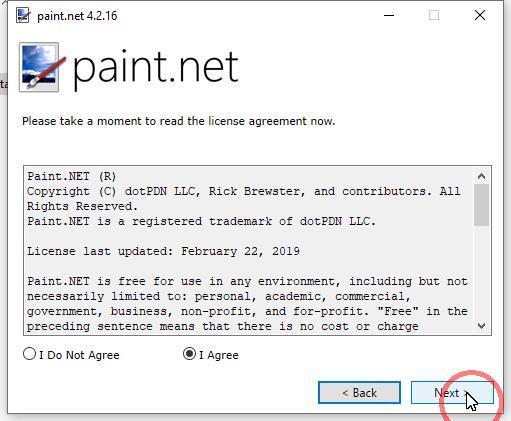
Step 7.
Run and complete the installer of an app you need to convert into MSIX (paint.net in our case).
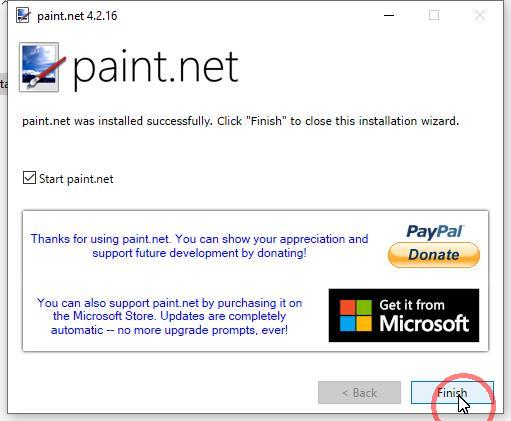
Step 8.
Run the installed app.
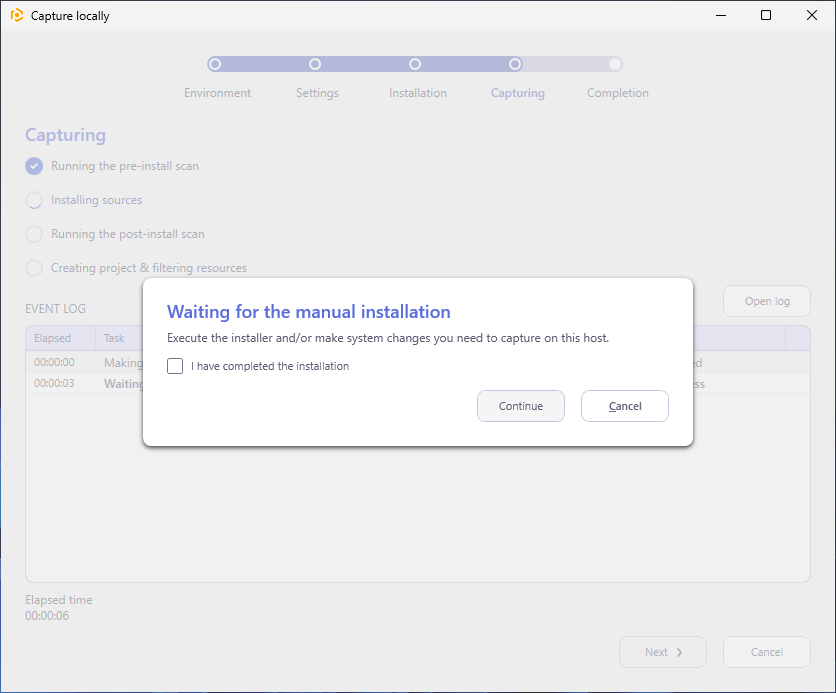
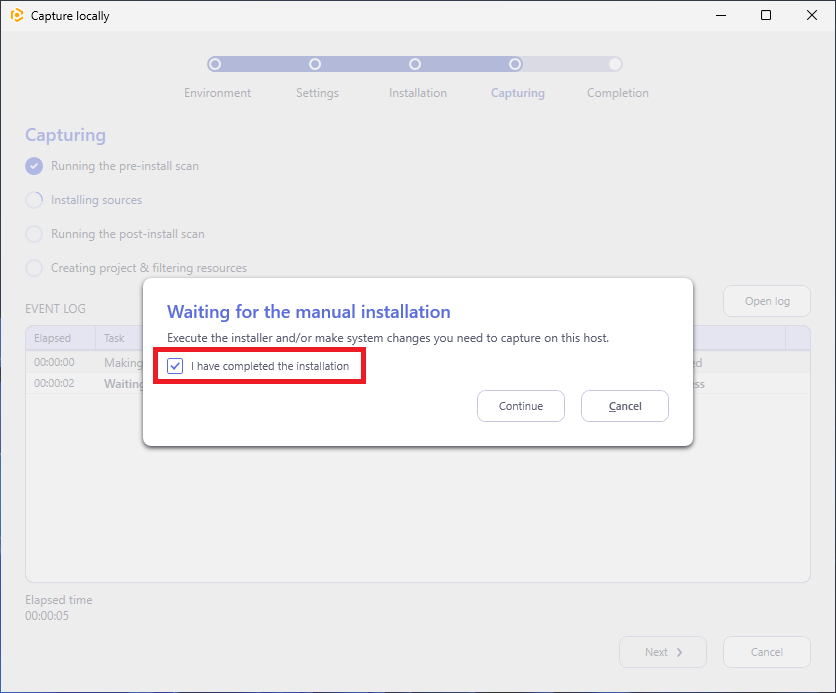
Step 9.
When finished, tick I have completed the installation and click Continue.
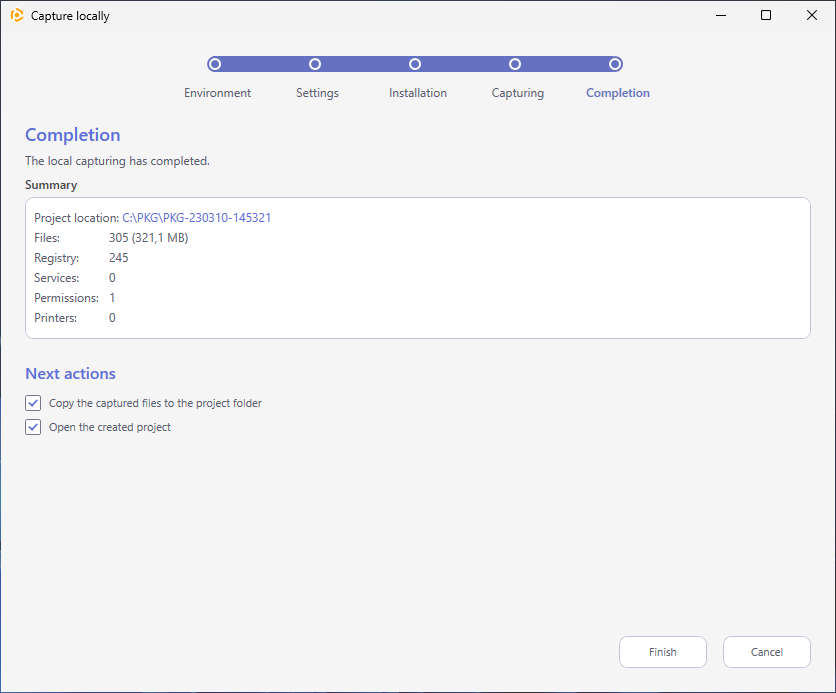
Step 10.
Capturing is completed. Tick Copy the captured files to the project folder and click Finish.
Step 11.
If some files that were detected during the capturing are currently missing or locked, they will be identified and displayed in the wizard. If the listed files are ‘system noise’ and do not belong to your application, click Finish to continue. In this case, sources of the missing and locked files won’t be copied to the folder, but their records will remain in the project file.
Step 12.
The captured project is automatically opened for editing in Package Generator.
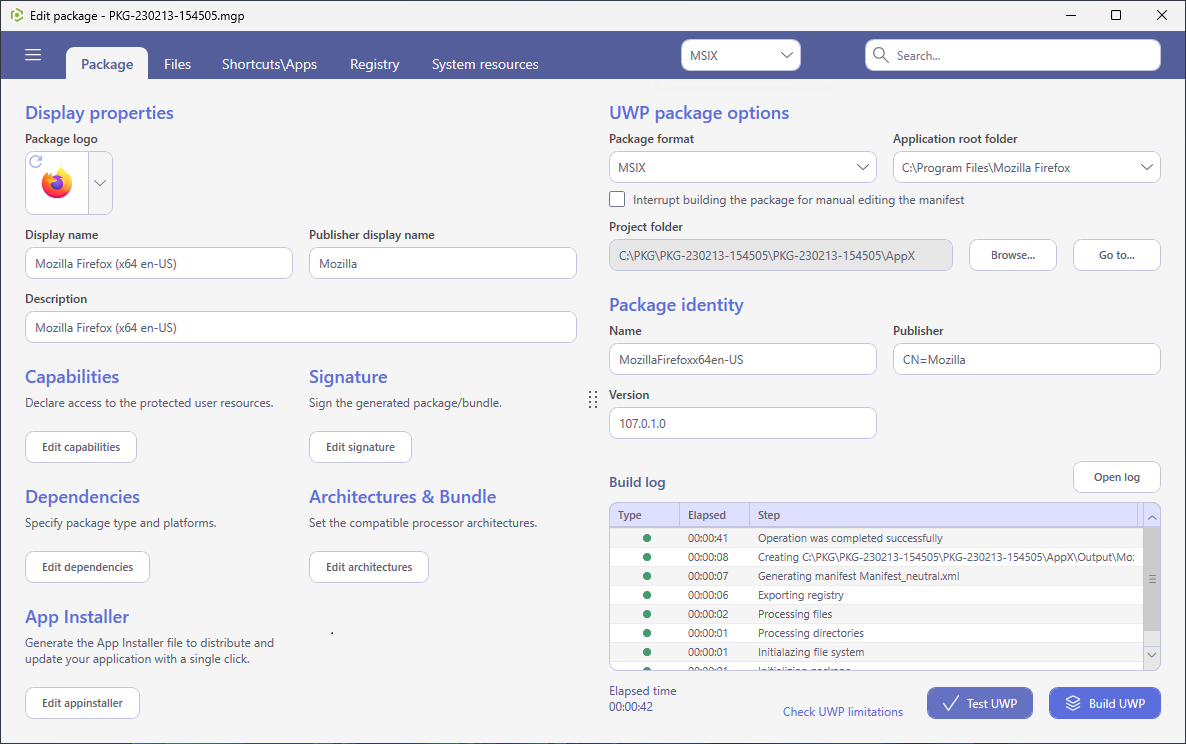
Step 13.
On the Package > MSIX tab you can view and manage the package properties and settings.
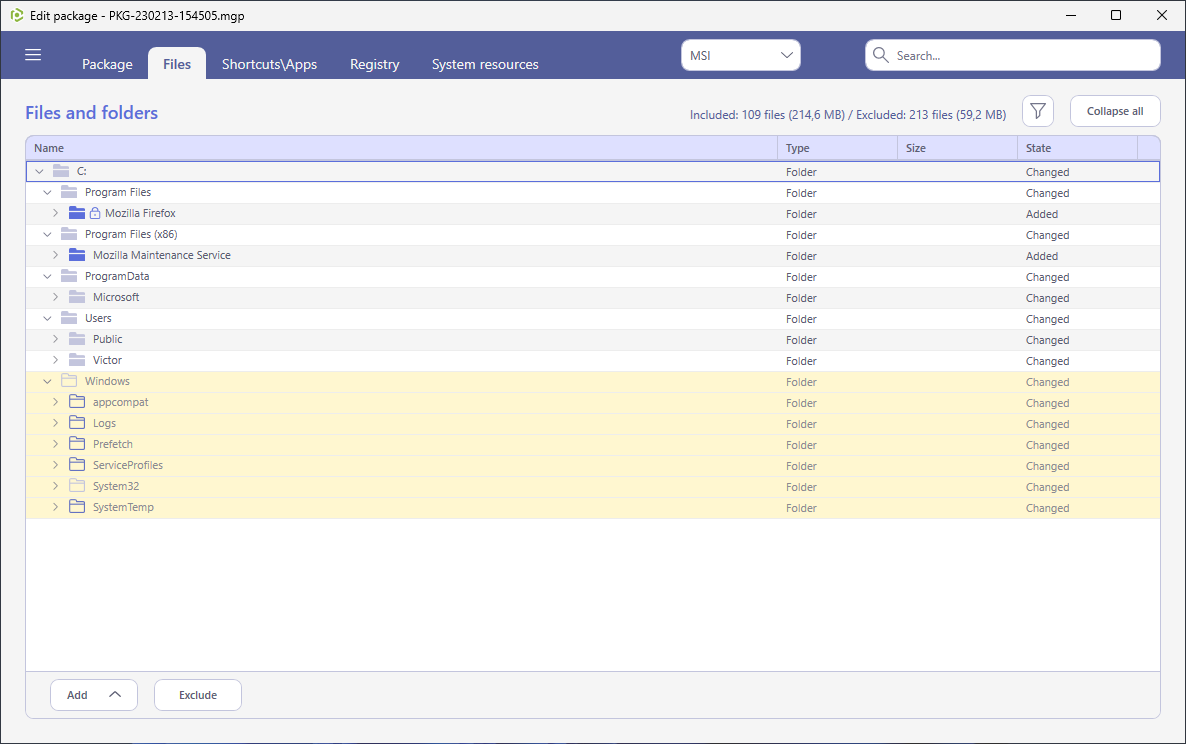
Step 14.
Switch to the Files and then to the Registry tab to review the captured resources and exclude/delete the unnecessary ones.
The excluded resources remain in the project as ‘Excluded’ (highlighted in yellow and crossed out) and they will not be built into the package. You can include them back at any time and rebuild the package.
In our case, there is almost nothing to delete from Files and Registry.
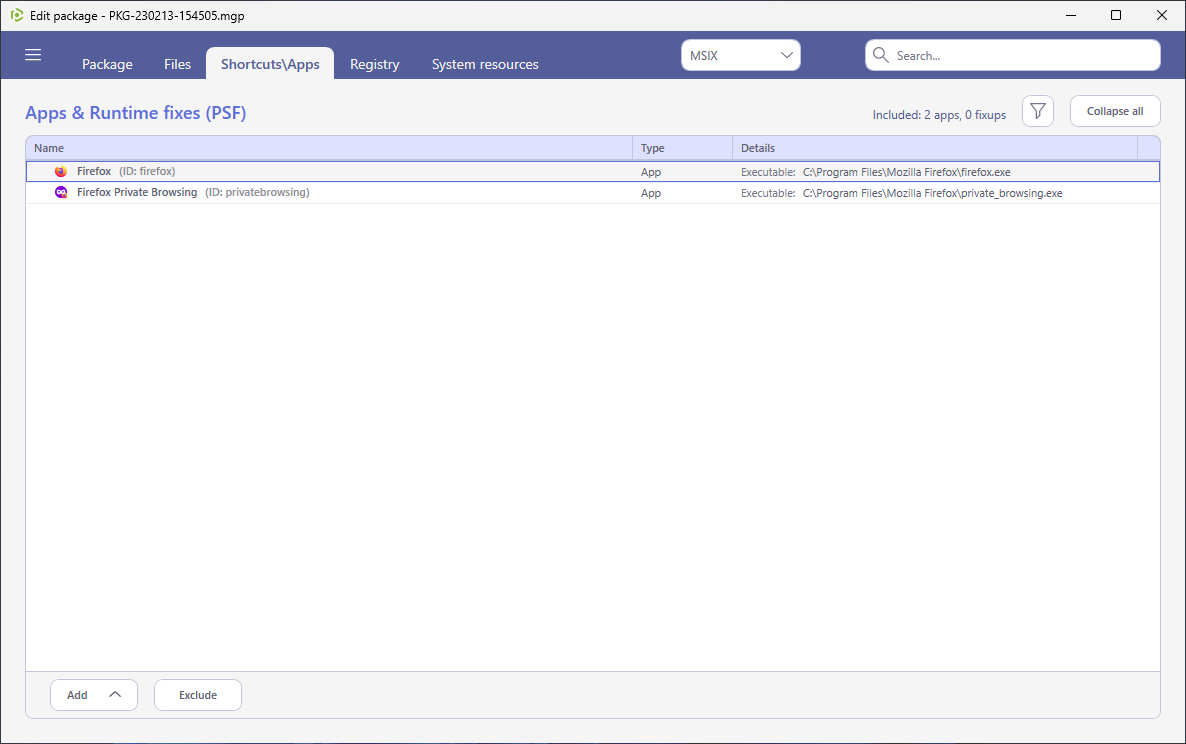
Step 15.
On the Shortcuts/Apps > MSIX tab you can view and manage apps (i.e. shortcuts) of the MSIX package and their runtime fixes (Package Support Framework).
NOTE: The Package Support Framework (PSF) is an open source kit that allows to apply runtime fixes to the repackaged Win32 app that fails to run in an MSIX container.
Step 16.
As you may know, MSIX packages for sideloading must be signed. The signature provides the user with verification that the app’s data has not been modified after it was signed while also confirming the identity of the user or company that signed it.
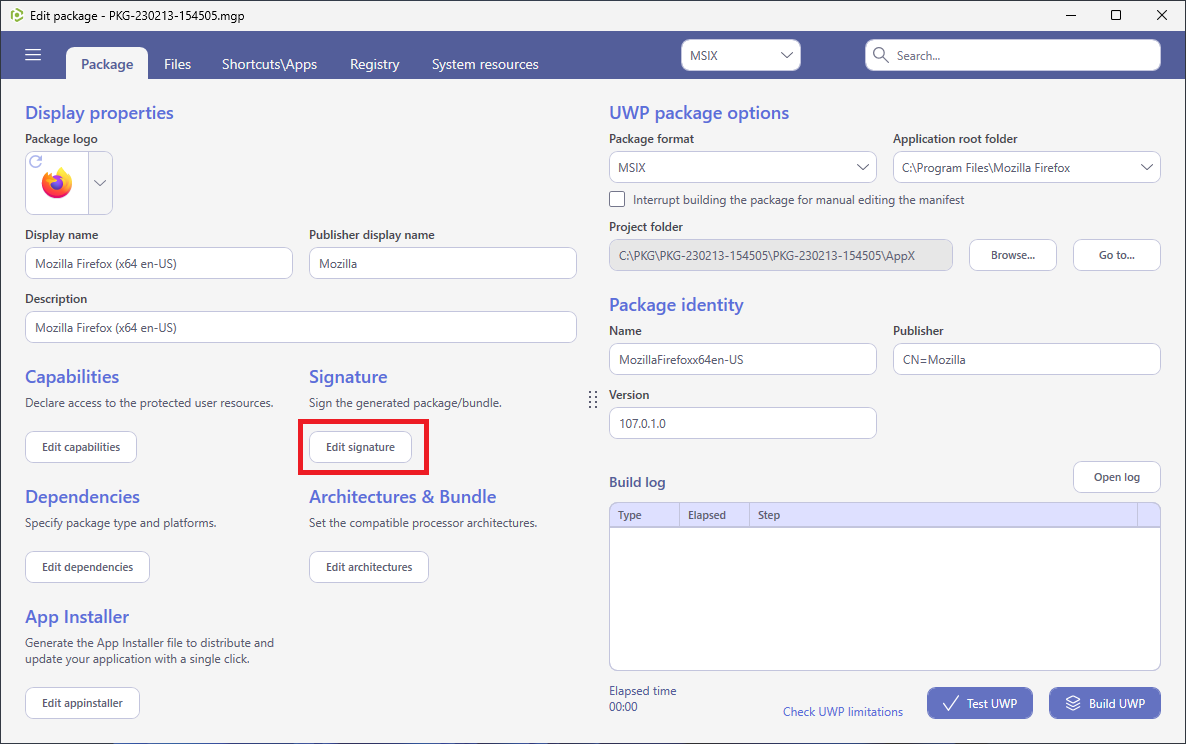
Step 17.
Select the necessary signing option, specify the certificate details and click Save.
Step 18.
Finally, ensure that Package format is set to “MSIX” (default option) and click Build UWP in the bottom right corner to generate the MSIX package from the project file.
Step 19.
Wait while the package generation is done.
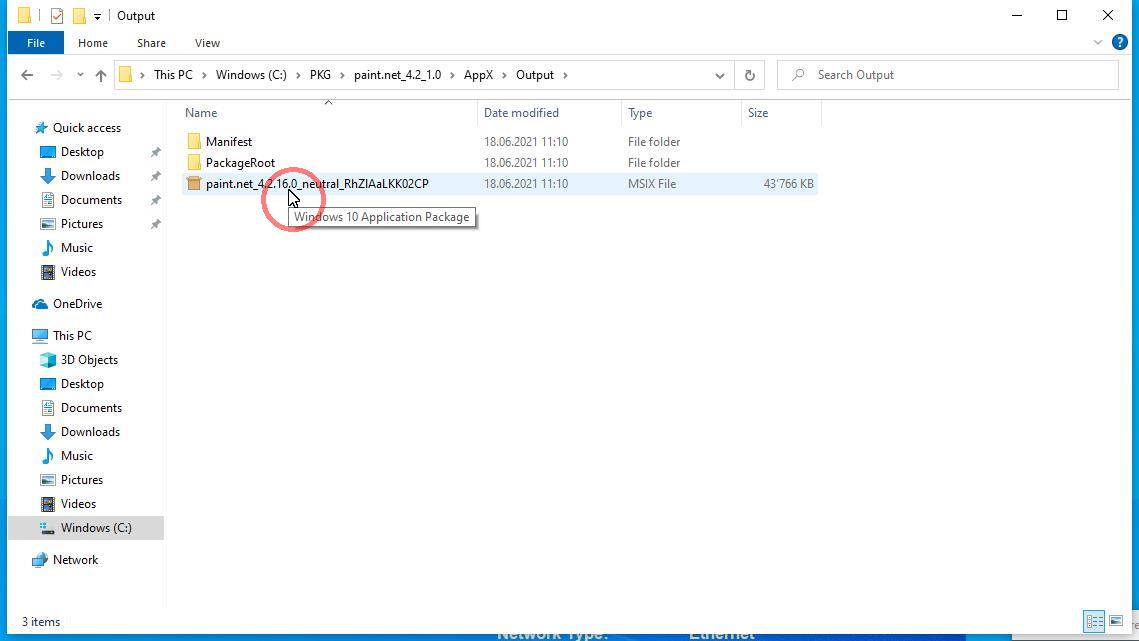
Step 20.
Click Go to… next to Project folder to open the current project folder in Windows Explorer. Then you can close the tool.
Step-by-Step Guide: Testing an MSIX Package
Step 1.
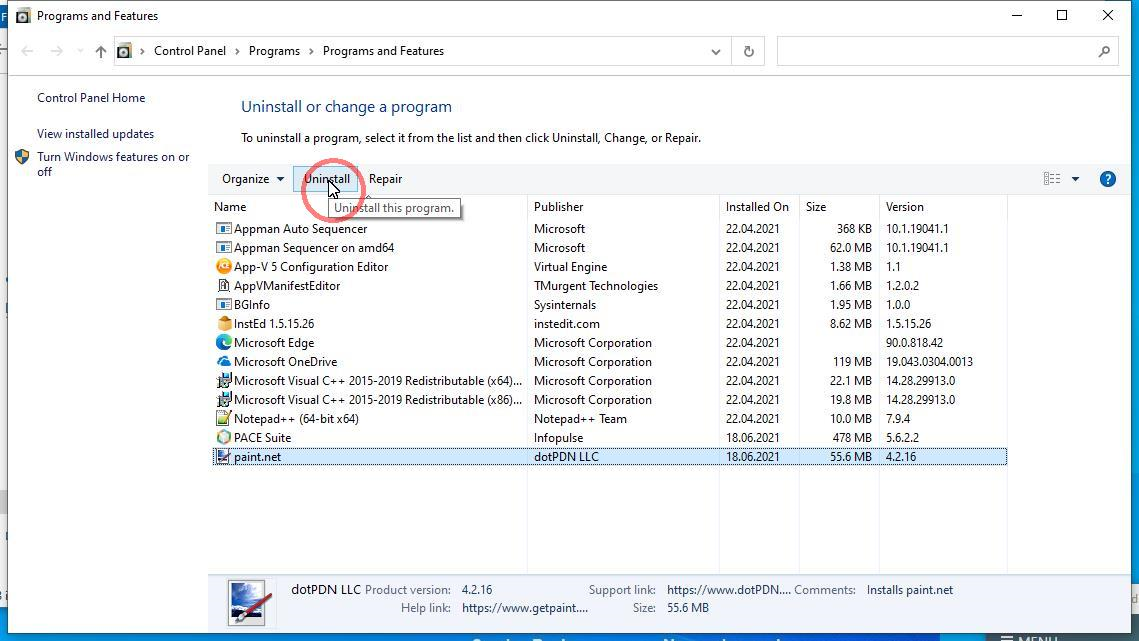
It is recommended to use a clean system for testing the created MSIX package. But, if you are going to use the same system, first, uninstall the original app installer that was previously installed during the capturing process (in our case Paint.Net).
Step 2.
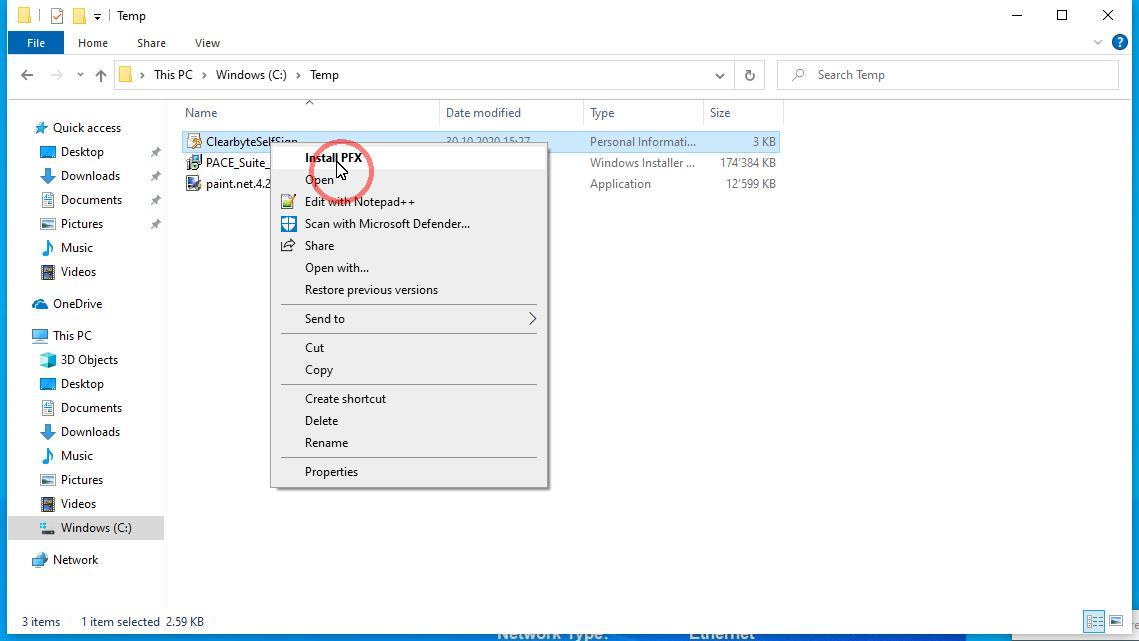
Ensure that the certificate, used for package signing, is trusted on that system. If you are using the self signed certificate, install it manually.
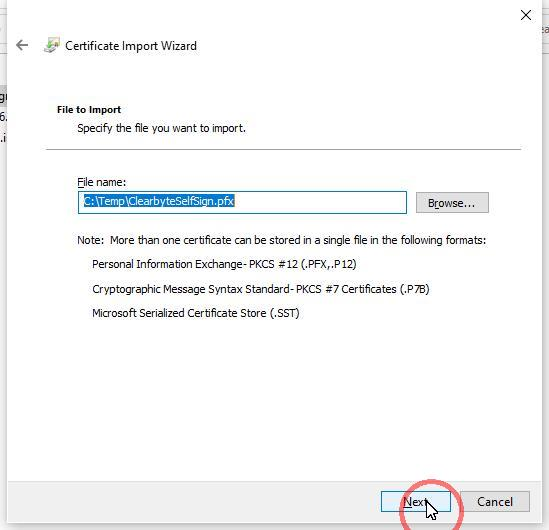
Step 3.
Select Install PFX from the context menu of Windows Explorer.
Step 4.
Select Local Machine.
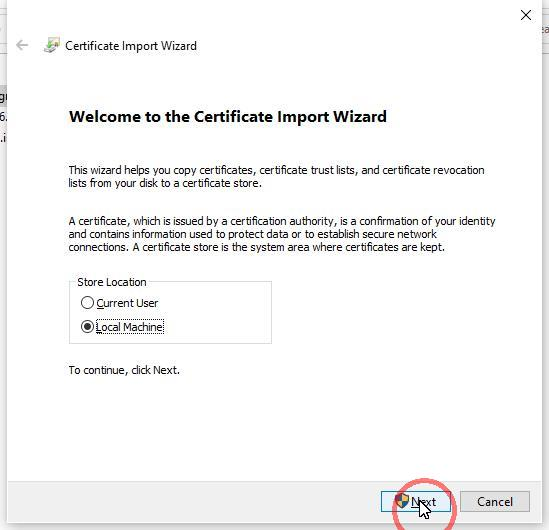
Step 5.
Select Next.
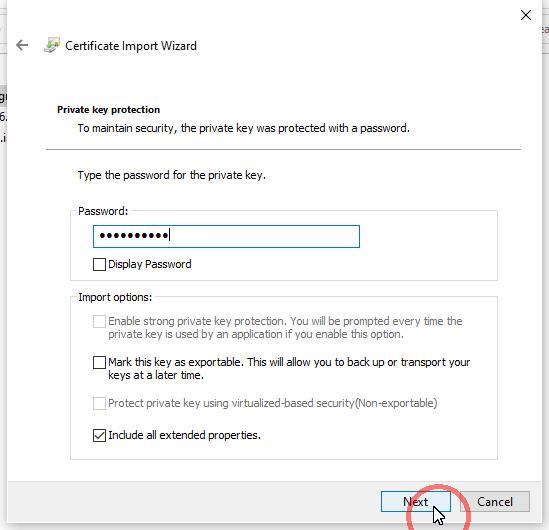
Step 6.
Enter the certificate password and click Next.
Step 7.
Select Place all certificates in the following store and click Browse….

Step 8.
Select the Trusted Root Certification Authorities (or Trusted People or Trusted Publishers) certificate store.
Note that by adding a certificate to local machine certificate stores, you affect the certificate trust of all users on the computer. It is recommended that you remove those certificates when they are no longer necessary to prevent them from being used to compromise system trust.

Step 9.
Click Next.

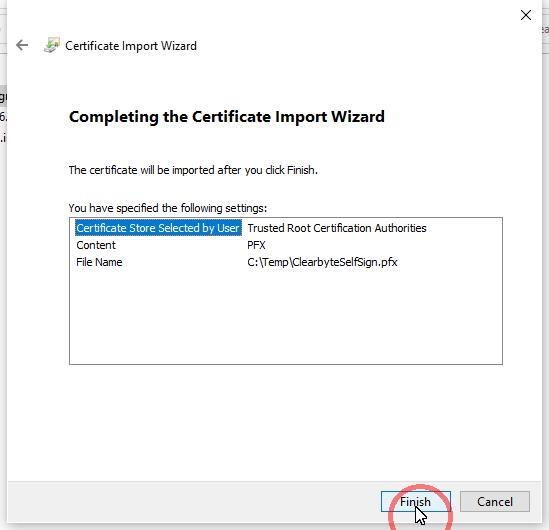
Step 10.
Click Finish.
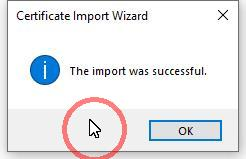
Step 11.
If the certificate import was succesful, close the message and proceed.
Step 12.
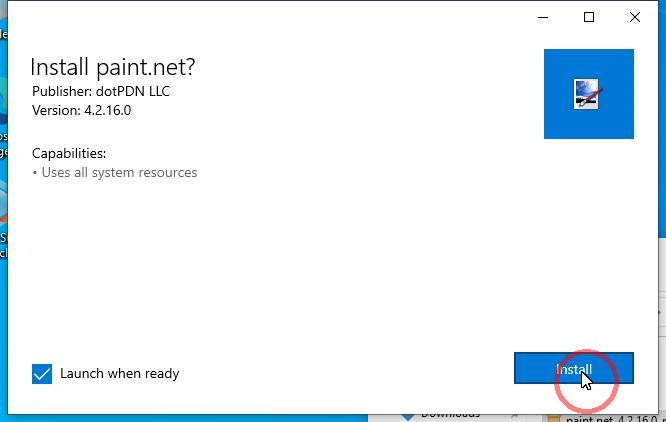
When the used certificate is installed, launch the created Paint.Net MSIX package from the Output folder.
Step 13.
Click Install.
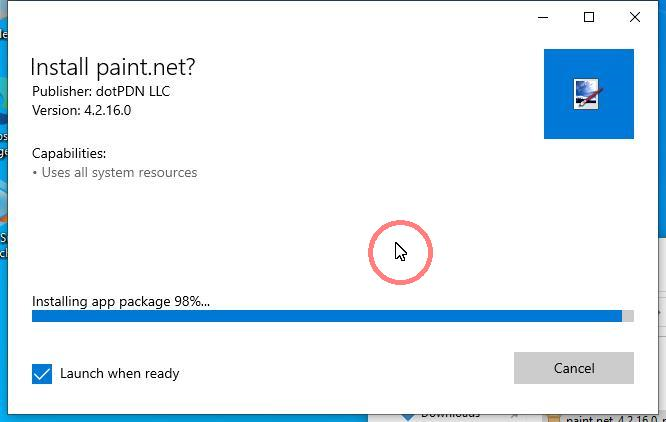
Step 14.
Wait while the package is installed.
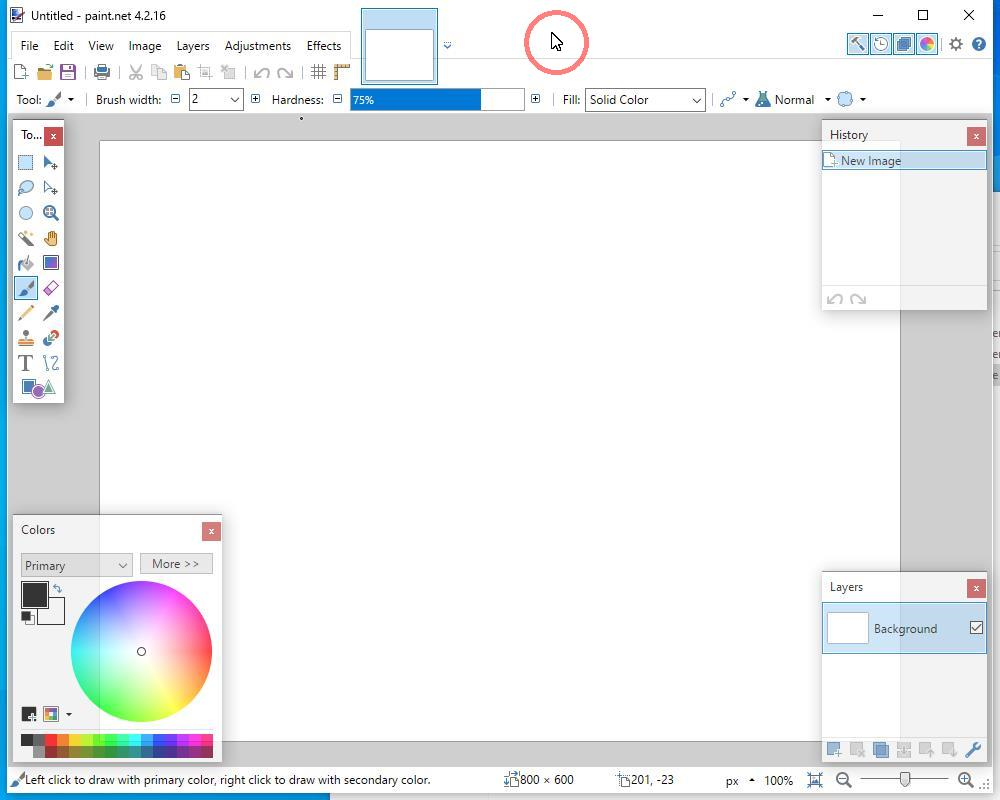
Step 15.
Paint.Net , installed from MSIX package, starts as expected.
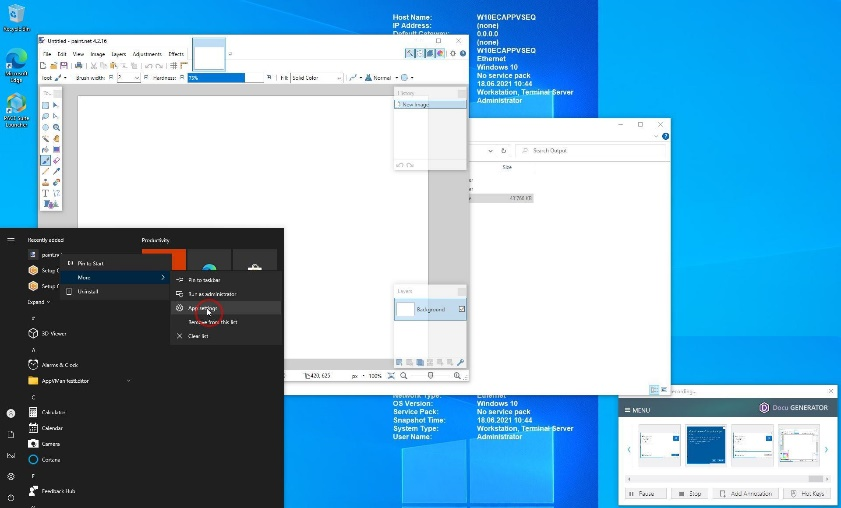
Step 16.
Select More > App Settings from the context menu of the installed MSIX app to view and ckeck package details.
Step 17.
Find information about the installed MSIX package.

Conclusion
Creating an MSIX package with the PACE Suite and snapshotting this process with the Docu Generator saves a lot of time, since the tool-driven approach grants a ready package with the corresponding documentation. The exclusion settings to filter the results are very well set, since it requires very little post-processing after the monitoring (“capture out of the box”). In addition, thanks to the project file (*.mgp), you can also create all other package formats from the one monitoring, that is if MSIX is not used, an MSI can simply be compiled from the same recording.
About the Author
Peter Fankhauser is a Senior System Engineer and Software Package Engineer at clearByte for the last 5 years. Mr. Fankhauser cooperates with customers on-site by creating MSI and APP-V packages with PACE Suite.