
Quick Microsoft App-V to MSIX Conversion with PACE Suite
Microsoft officially announced the end-of-life for App-V (Application Virtualization) on April 14, 2026, signaling the need to transit to more modern packaging formats. To simplify this reluctant transition, PACE Suite 6.3 introduces its Quick App-V to MSIX Conversion feature.
What Is App-V and Why Transition to MSIX?
App-V (Application Virtualization) has been a reliable solution for delivering virtualized applications without requiring traditional installations. However, with its end-of-life coming soon, businesses must explore an App-V alternative that aligns with modern deployment needs.
MSIX is Microsoft's advanced packaging format designed to enhance application security, simplify deployment, and ensure seamless integration with modern Windows systems. The debate of MSIX vs. App-V is clear: MSIX offers superior performance, reduced conflicts, and better compliance capabilities.
Why Choose MSIX over App-V?
While App-V has served its purpose, MSIX offers compelling advantages:
- Future-Proofing: With Microsoft App-V set to reach its end-of-life, adopting MSIX ensures compliance with Microsoft’s evolving standards.
- Enhanced Security: MSIX packages can be digitally signed, which ensures application integrity.
- Simplified Updates: MSIX allows for differential updates, saving bandwidth and deployment time.
- Broader Compatibility: MSIX is natively supported on modern Windows platforms, ensuring seamless deployment.
PACE Suite: Solution for Smooth App-V Replacement
Migrating from App-V to MSIX typically involves a manual process that takes much time and resources. Addressing these challenges, PACE Suite 6.3 addresses these challenges with its automatic App-V to MSIX conversion feature, making it a top choice for organizations seeping an efficient App-V replacement tool.
With PACE Suite, businesses can easily repackage their applications and ensure a smooth migration to MSIX – without needing advanced expertise in application packaging.
Key Steps: Quick App-V to MSIX Conversion
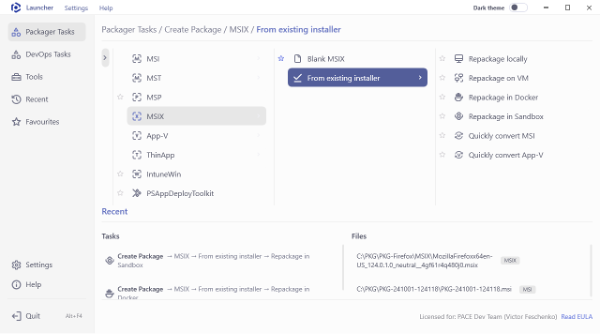
The feature is available through the menu Packager Tasks > Create Package > MSIX > From existing installer > Quickly convert App-V:
PACE Suite 6.3 simplifies migration through a user-friendly wizard that completes the App-V to MSIX conversion in just three steps:
- Resource Extraction. The wizard extracts all necessary components, such as files, registries, shortcuts, and COM objects, from the selected App-V or MSI package.
- Project Creation. It then creates a Package Generator project, importing these resources as the foundation for the future MSIX package.
- MSIX Build. Finally, the wizard builds the MSIX package. Users only need to specify the package location and signature parameters (if necessary), letting the tool handle the rest.
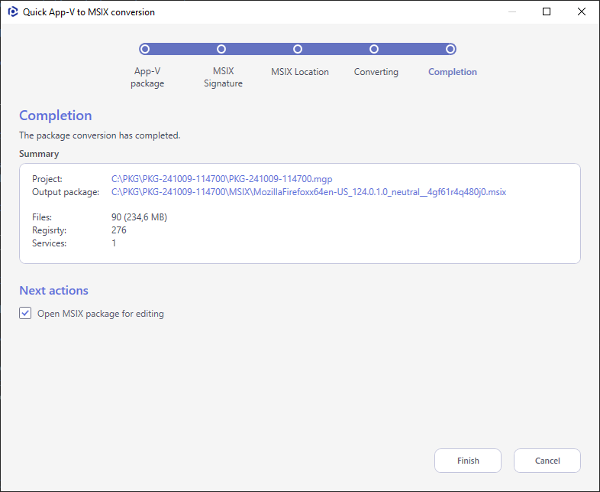
For mid-sized packages, the automated process takes just 1-2 minutes. Check the user guide for more detailed instructions.
Benefits of PACE Suite’s Quick App-V to MSIX Conversion
- Speed and Efficiency: Automate time-consuming manual processes to complete conversions in minutes.
- User-Friendliness: The intuitive wizard eliminates the need for in-depth technical expertise.
- Cost-Efficiency: Save resources by streamlining the conversion process and no need for additional software.
- Future-Ready Applications: Transition to MSIX ensures compliance with Microsoft’s future-ready format.
- Versatility Across Formats: PACE Suite supports both MSI and App-V to MSIX conversion.
Microsoft’s announcement about App-V’s end-of-life makes it essential for organizations to act now. Delaying the transition can lead to operational disruptions and increased costs.
PACE Suite 6.3 addresses these challenges by offering a robust and reliable tool for converting Microsoft App-V and MSI packages to MSIX, an up-to-date App-V alternative for future-ready, secure, and efficient application packaging.
Don’t let the April 2026 deadline catch you off guard – stay prepared with PACE Suite 6.3 offering seamless migration with no stress and no extra costs!