
Automation in Application Packaging: Capturing in PACE Suite
The workload of an application packager often includes a significant amount of manual work. This article will demonstrate how to automate specific processes using PACE Suite, an intelligent app packaging tool, as IT automation software not only saves time and money but also plays a crucial role in maintaining your team’s productivity.
Here, we will specifically focus on utilizing automation in application packaging for capturing on the localhost through both the command line interface and user interface. Additionally, we will explore capturing on remote virtual machines.
Automating via Command Line and User Interface in PACE Suite
The application packaging lifecycle typically comprises five major stages: assessment, packaging, patching, testing, and deployment. While the assessment stage may still require manual intervention, several processes during the packaging phase can be automated with the help of the (CLI) command-line interface of PACE Suite. The solution also offers automation options through its user interface.
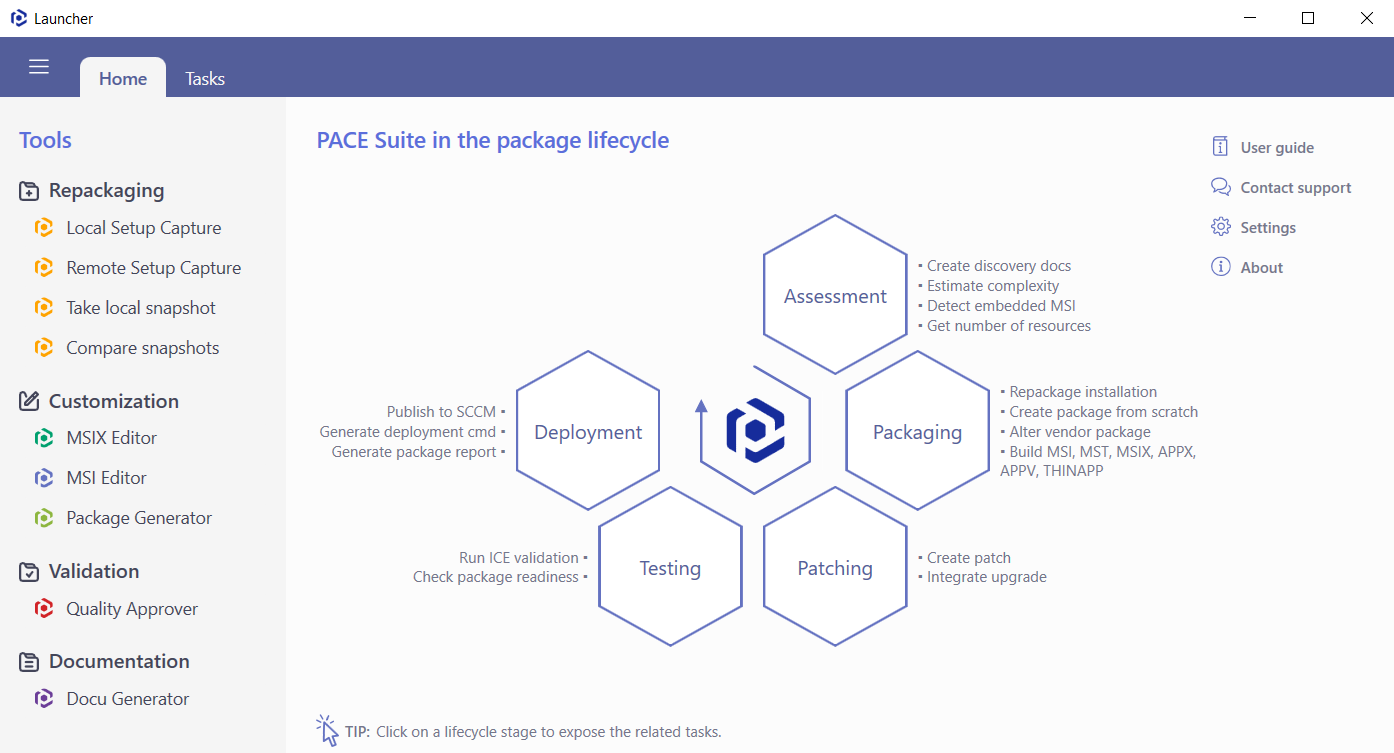
Capturing Automation
The term “capturing” in application packaging refers to identifying and recording changes made to an application or system during installation. PACE Suite allows the automation of capturing processes on the localhost and a remote virtual machine. Let’s consider the first case.
Capturing on the Localhost via the CLI
It should be noted that the commands in this article are used for illustration purposes only. As an example of automated capturing of source installers on the local host, we use the following syntax and usage.
Syntax:
“SetupCaptureLocal.exe” [–parameter “value” ]
Usage:
“SetupCaptureLocal.exe” take-snapshot –snapshot “C:\PKG\SNAPSHOTS\snap_1.msgn” –scan-registry “HKLM HKCU HKU\.DEFAULT
The default installation path of SetupCaptureLocal.exe is:
- x64 OS: C:\Program Files (x86)\PACE Suite\Setup Capture\App\
- x86 OS: C:\Program Files\PACE Suite\Setup Capture\App
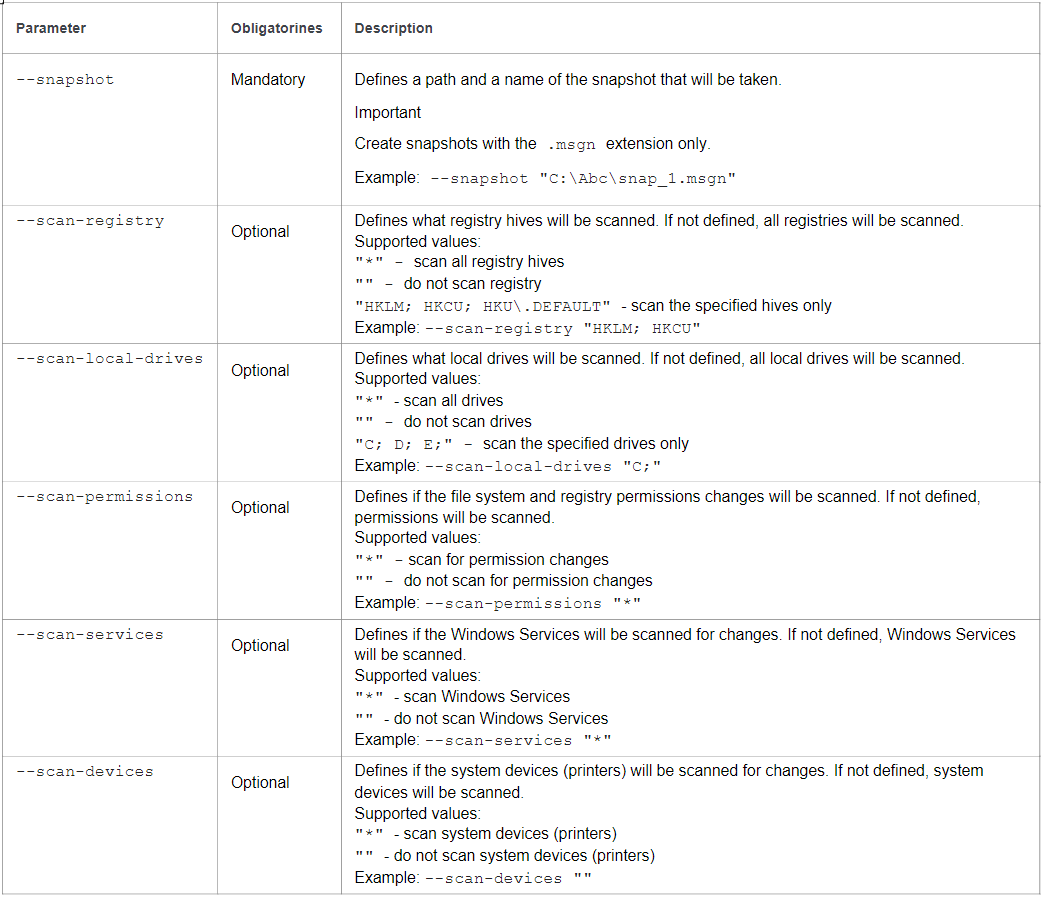
We can enter two commands: take-snapshot and compare-snapshot. The take-snapshot command helps record the state of the file system and registry of the local host into the snapshot, which can be later used to create a project on the difference between the two snapshots.
The Take-snapshot Command Parameters
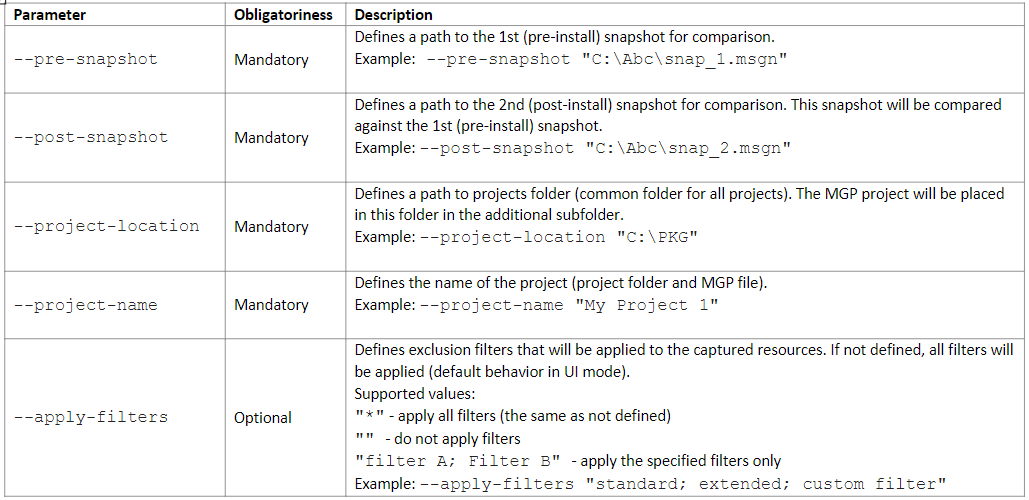
The Compare-snapshots Command
The compare-snapshots command helps compare two snapshots (usually pre-install and post-install) to discover changes that were made to the system. The detected changes will be saved as an MGP project.
The parameters include the following:
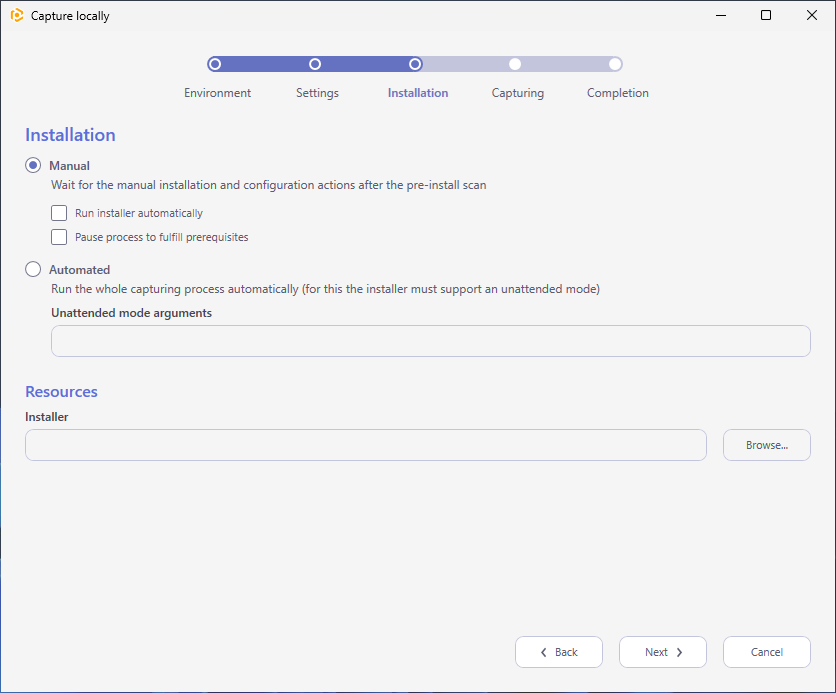
Capturing on the Localhost via UI
When conducting local capturing in PACE Suite, you can choose two modes: manual and automated. To replicate the capturing results achieved through the command line, select the automated mode and specify your installer and unattended mode arguments (e.g., /S for Firefox).
In the automated mode, the wizard executes your source installation with arguments between the pre-install and post-install scans. The post-install scan begins once the source installation process is accomplished.
Capturing on a Remote Virtual Machine
The primary automation of capturing processes on a remote virtual machine occurs through the command line. Initially, we can automate processes related to known packages for which we understand the repackaging procedure. For this case scenario, we can create a script to repackage an installation on a remote virtual machine.
To initiate remote capturing, we need to preconfigure the remote virtual machine.
Syntax:
“SetupCaptureRemote.exe” [–parameter “value”]
Usage:
“SetupCaptureRemote.exe” capture-remotely –vm “172.16.1.100;WIN10_1809_EN” –project-location “C:\PKG” –project-name “My Project 1” –source-installation “C:\Setup\setup.exe” –args-for-unattended-install “/silent /no-restart”
The default installation path of SetupCaptureRemote.exe is:
- x64 OS: C:\Program Files (x86)\PACE Suite\Setup Capture\App\
- x86 OS: C:\Program Files\PACE Suite\Setup Capture\App
The capture-remotely command allows capturing in the Snapshotting mode on the remote virtual machine in an unattended mode.
The parameters of the command include the following:
Mandatory parameters
- –vm defines a virtual machine on which capturing will be performed. Supported value: “;” – run capturing on the remote virtual machine where is a host or IP address of the virtualization solution (for VirtualBox is virtualbox); and is a name of a virtual machine, configured for capturing. Example: –vm “172.16.1.100;WIN10_1809_EN”; –vm “virtualbox;WIN10_1809_EN”
- – – project-location defines a path to projects folder (common folder for all projects). The MGP project will be transferred from the remote virtual machine to your workstation (PC) and saved to the specified projects folder in the additional subfolder. Example: –project-location “C:\PKG”
- – – project-name defines the name of the project (project folder and MGP file). Example: –project-name “My Project 1”
- – – source-installation defines a path to the installer that you need to capture. This file will be transferred to the remote virtual machine. Example: –source-installation “C:\Setup\setup.exe”
Optional parameters
- – – scan-registry defines what registry hives of the virtual machine will be scanned. If not defined, all registry will be scanned. Supported values: “*” – scan all registry hives “” – do not scan registry “HKLM; HKCU; HKU\.DEFAULT” – scan the specified hives only Example: –scan-registry “HKLM; HKCU”
- – – scan-local-drives defines what local drives of the virtual machine will be scanned. If not defined, all local drives will be scanned. Supported values: “*” – scan all drives “” – do not scan drives “system” – scan the system local drive only (usually C:) “non-system” – scan all local drives except the system one (usually D:, E:, etc.) Example: –scan-local-drives “system”
- – – scan-permissions defines if the file system and registry permissions changes of the virtual machine will be scanned. If not defined, permissions will be scanned. Supported values: “*” – scan for permission changes “” – do not scan for permission changes Example: –scan-permissions “*”
- – – scan-services defines if the Windows Services of the virtual machine will be scanned for changes. If not defined, Windows Services will be scanned. Supported values: “*” – scan Windows Services “” – do not scan Windows Services Example: –scan-services “*”
- – – scan-devices defines if the system devices (printers) of the virtual machine will be scanned for changes. If not defined, system devices will be scanned. Supported values: “*” – scan system devices (printers) “” – do not scan system devices (printers) Example: – – scan-devices “”
- – – apply-filters defines what exclusion filters will be applied to the captured resources. If not defined, all filters will be applied (default behavior in UI mode). Supported values: “*” – apply all filters (the same as not defined) “” – do not apply filters “filter A; Filter B” – apply only specified filters Example: –apply-filters “standard; extended; custom filter”
- – – copy-related-files defines the installer-related files that should be copied to the remote virtual machine along with specified above installer. If not specified, no additional files will be copied. Supported values: “*” – copy all files/subfolders located in the folder with the specified installer. “” – copy the specified files and folders only. The path could be absolute or relative. Example: –copy-related-files “Folder A;File B.ext;File C.ext”
- – – vm-restore defines if the virtual machine will be restored to the previous state after the capturing completion. If not specified, the virtual machine will be restored. Supported values: “yes” – restore “no” – do not restore Example: –vm-restore “no”
Once all the necessary parameters are configured, the capture-remotely command automatically runs the indicated virtual machine, takes a pre-install snapshot, copies the source installation, and initiates the installation with the specified arguments.
After the installation, it takes a post-install snapshot, compares the two snapshots, and creates the project, saving the difference between the snapshots in the designated folder.
In summary, this command-line automation streamlines the entire capturing process and is particularly useful for installations that support silent mode and for repackaging MSI installations into MSIX or APPV.
This automation can be beneficial for bulk conversion when assessing which MSI installers can be converted into MSIX, especially when dealing with a large number of applications. You can use the script for each application to determine if conversion is feasible, allowing you to check if the repackage of multiple MSIs into MSIX is possible without manual intervention.
By automating key processes such as capturing on the local host and virtual machine, you can significantly streamline your workload and boost efficiency.
Discover a seamless approach to application packaging and how to bring automation to building MSI, MSIX, APPX, and APPV packages, testing, and editing with PACE Suite. Building Package Automation, part 2 .