Repackaging an EXE file to a Windows Installer (MSI) package is a common task for application engineers. The classic use case is converting EXE to MSI to run a silent installation that does not require interactions with the end user.
Follow this in-depth guide to learn how to create MSI from EXE and capture the modified permissions to the file system and registry along with services, environmental variables, files, and registry.
Contents
What is an MSI file
The MSI file abbreviation stands for Microsoft Software Installer. Simply put, it’s a Windows Installer format that configures installer packagers such as Windows apps. To do this, MSI uses Microsoft’s Windows Installer service to install software on Windows OS.
EXE to MSI Converter: Step-by-Step Guide
In this tutorial, we use the latest PACE Suite version. To follow the steps to create MSI from EXE described in the guide, request a free trial of the application packaging tool:
Capturing installation file
Take the following actions to capture an installation file:
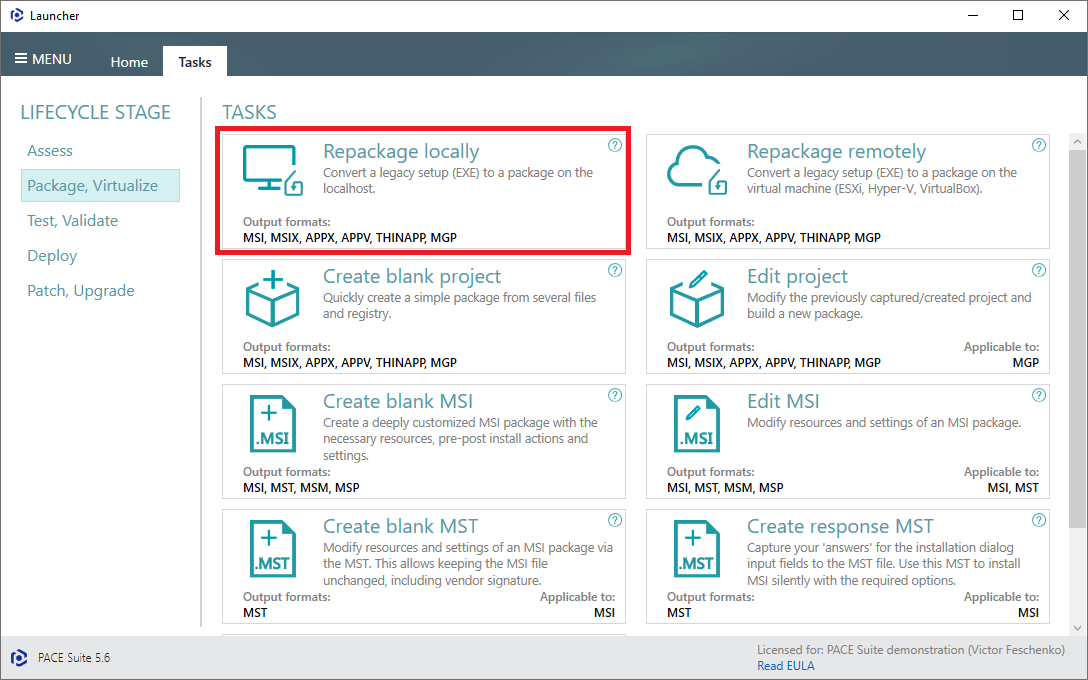
1. Run PACE Suite Launcher
2. Click on the Package Virtualize
3. Choose Repackage Locally in the Tasks Tab
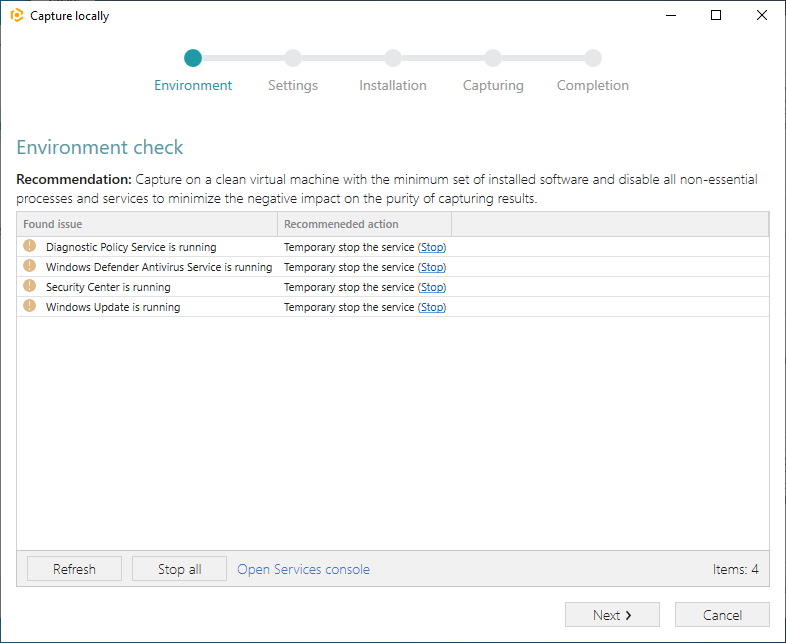
4. To avoid capturing a ‘system noise’ and get more pure capturing results at the Environment stage, choose the Stop All button to stop running the non-essential services and processes displayed in the list. Then, click Next.
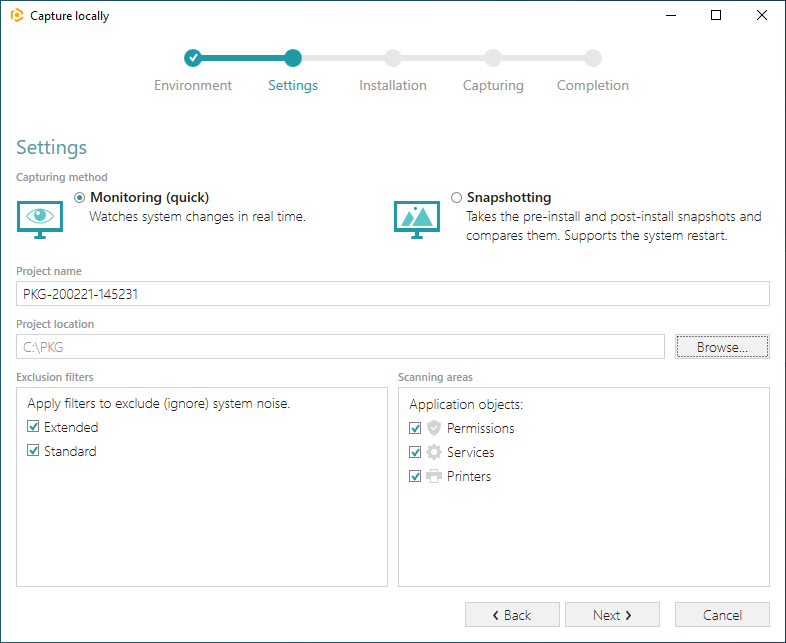
5. Select the capturing method, project name, and location during the Setting stage. Choose exclusion filters to detect and filter out unnecessary resources.
Click Next .
Please, take note that:
- The Monitoring method is used for quicker capturing;
- The Snapshotting method captures massive installations and those that require the system restart. It is based on two comparing snapshots — pre-install and post-install ones.
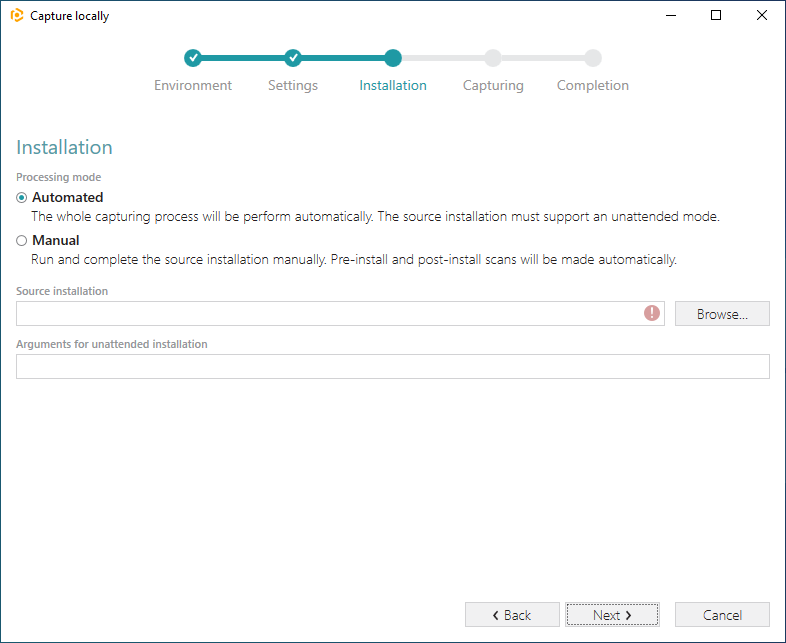
6. You need to select the installation processing mode at the Installation phase and click Next .
Please, note that:
- In the Automated mode, the wizard runs your Source installation with Arguments between the pre-install and post-install scans. The post-install scan starts once the process of the run source installation is ended.
- In the Manual mode, the wizard will pause after the pre-install scan to allow you to install any set of apps, change the required app settings and make any system changes you need to capture and include in the package.
- unnecessary files or folders by going to the Files tab and selecting Exclude from the context menu of an item located in the left ‘Files Included’ pane;
- unnecessary registry keys or values by going to the Registry tab and selecting Exclude from the context menu of an item located in the left ‘Registry Included’ pane;
- unnecessary services by going to the System resources -> Services tab and unchecking the checkbox before the service name in the list for those services you want to exclude.
- Automate package quality, safety and deployment readiness checks.
- Capture installations remotely on multiple virtual machines hosted on the ESXi, Hyper-V and VirtualBox hypervisors.
- Create Windows Installer package, edit it, create transforms, patches.
- Automate routine packaging tasks and generate package documentation.
By default “Automated mode” is chosen, therefore select the installer file (e.g., Firefox Setup.exe) and click Open. Follow the installation dialogs of the launched source installation to complete it. Once the source installation is completed, we recommend checking if the Detected MSI installations tab does not contain found MSI installers.
Even if your source installation is an EXE file, it could contain embedded MSI installers, launched hiddenly. As you may know, repackaging existing vendor MSI installers into MSI is against Microsoft best practices. So, if the Detected MSI installations tab contains a found MSI installer, consider canceling this capturing (repackaging) process and switching to editing it in MSI Editor. Note that the found MSI installers are copied to the project folder.
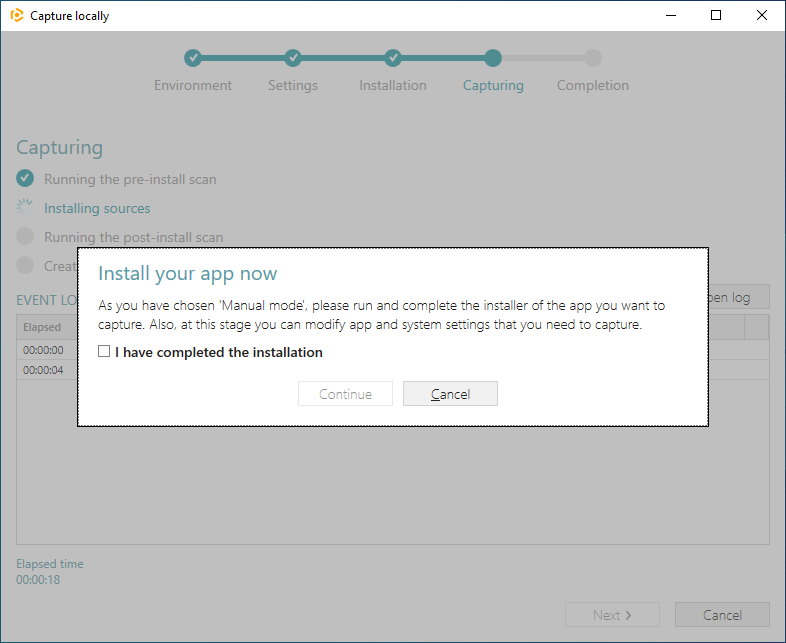
7. If you have selected the Manual mode:
a) Wait while the pre-install scan is made.
b) Run and complete installers of apps (for instance, Firefox Setup.exe) or make any system changes you need to capture.
c) Tick the “I have finished the installation” box and click Continue to complete the capturing. Wait for a little while until the capturing process is finished, filtering captured data and creating the project.
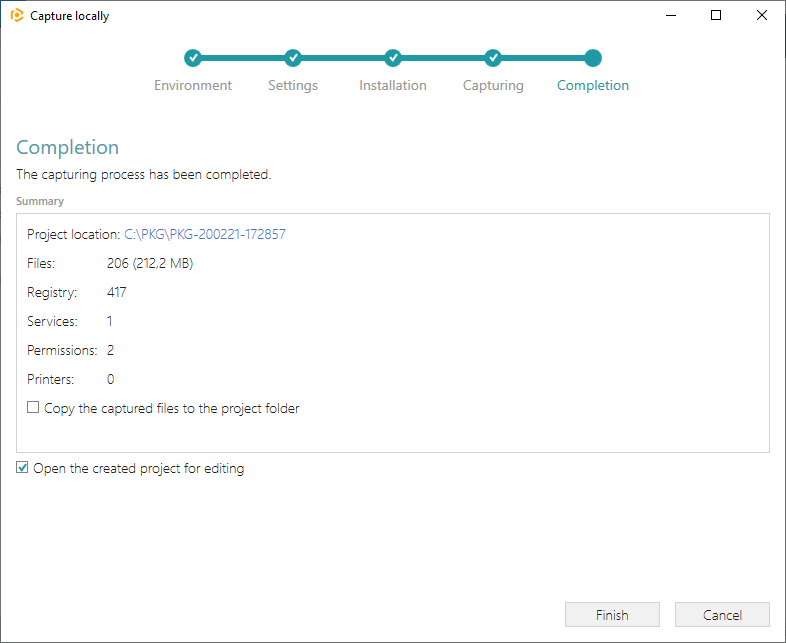
8. Capturing is completed.
Check “Copy the captured files to the project folder” and “Open the created project for editing” checkboxes. Click Finish to close the wizard at the Completion stage. By default, the created capturing project will be opened for editing.
Note: In some cases, a package with captured resources that belong to the system-related services like Windows Updates may fail during the installation. The common reason for such failures is trying to write to the system-protected registry/folders, locked for third-party installers.
9. You can make any changes to the file system and registry you want to capture and include in the package. For instance, you can create new or copy-paste existing files, import REG files to the system registry, and change permission settings. In addition, you can also launch the installed application to capture application configurations, like disabling updates, specifying product information, compression type, advertising tables, active setup, and other necessities for your MSI settings.
10. Remember to review and exclude:
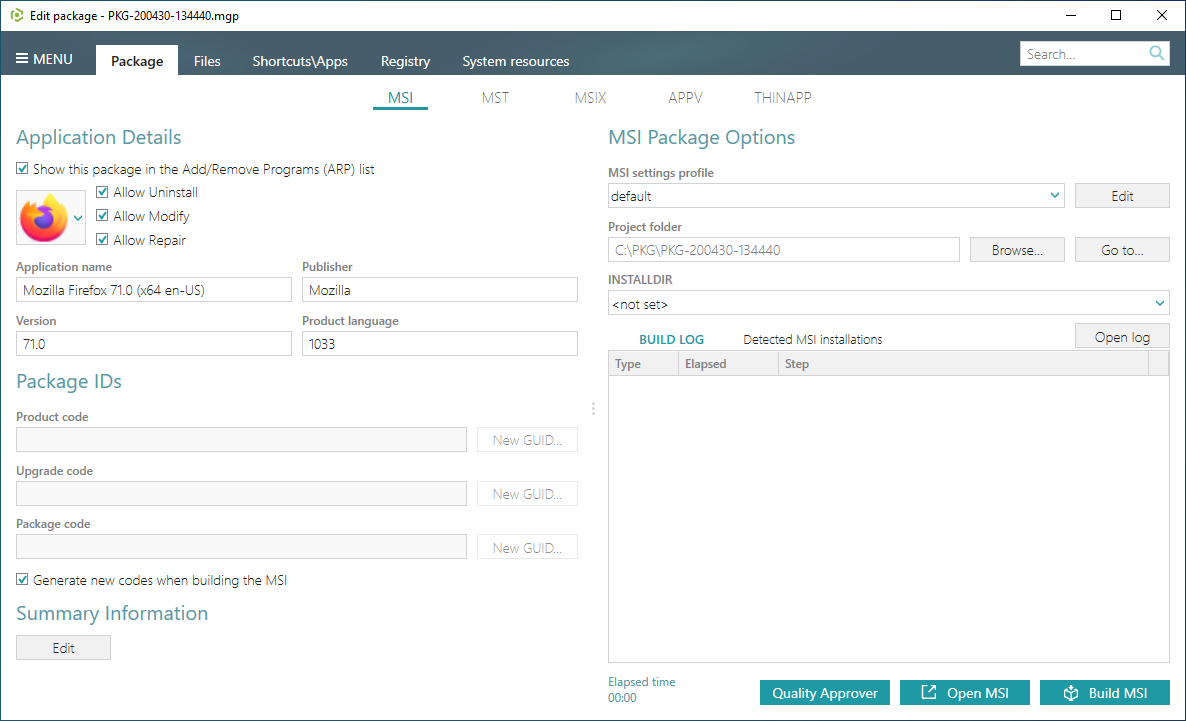
Repackaging EXE to MSI
Once the project is opened in the project editor, you can click the Build MSI button. However, we recommend reviewing the captured resources at the Files, Registry, System resources, Permissions, and Shortcuts, and FTAs tabs and excluding unnecessary resources from the project.
Unnecessary resources are files and registry entries, usually created or modified due to operating system work. They cannot be a part of your captured application. Unfortunately, no universal rule exists to discover which captured files or registry entries should be excluded. So leave out only those that do not refer to your captured app (e.g., NOD32 antivirus files couldn’t be a part of a Firefox application).
To repackage EXE to MSI with PACE Suite:
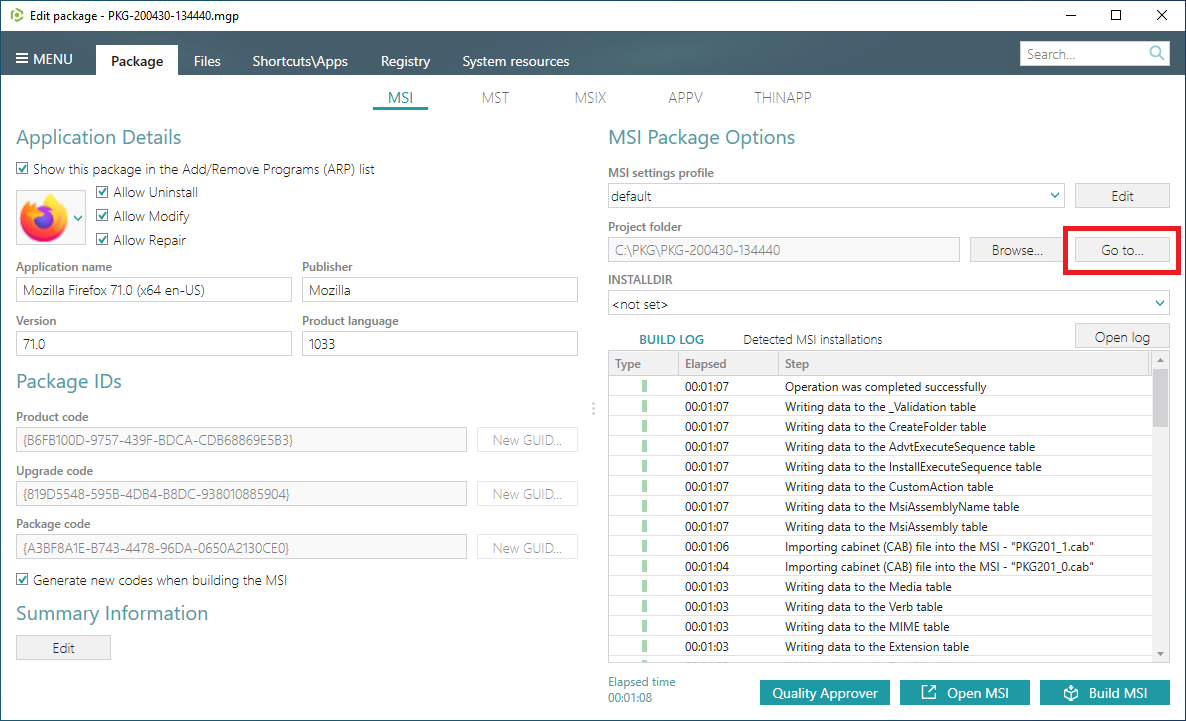
1. Generate the MSI package by clicking Build MSI in the Package > MSI tab.
2. Find your package in the “MSI” subfolder of the project folder.
To open the latter, click Go to…, located next to the Project folder field.
Congratulations, now you’ve finished repackaging EXE to MSI! You may also need to check out our quick MSI package validation guide.
Benefits of using PACE Suite for converting EXE to MSI
At each stage of app packaging, you’ll be guided by intelligent wizards to create, change, and test packages, as well as check them for quality, safety, and deployment readiness. In addition, with PACE Suite you’ll be able to:
If you have any questions, feel free to contact our support .